Monday, September 24, 2012

Project Dining Room: Wall decor part II


I wrote a short post here that talked about cheap and easy wall decor using scrapbook paper and cheap frames. The idea of course was inspired by Pinterest.... You can find it here at this post. I did mine a little differently then shown there, but the same general idea. I thought I'd put up a picture to show you how I hung my wall art.


Okay, actually it was my older sister Erin that hung my pictures up for me. Along with the curtains, the picture frame you can see off to the side and she also created a cute little table runner by adding 3 pieces of burlap ribbon to by painfully plain white table cloth. She's a much better interior decorator than I am. But I am patting myself on the back for picking out the cute curtains all by myself!

The dining room is slowly coming along. I am standing in the door way from the kitchen when I took this picture and the wall to the left of me has some white floating shelves on it that I'm still not satisfied with so pictures of that will come later.

Sunday, September 16, 2012

Rotten Bananas


I love the sight of rotten bananas in the fall. It can mean only one thing - BANANA BREAD!

I know I said I probably wouldn't be posting much cooking stuff after my last post, but this just happens to be a coincidence that I woke up and found rotten bananas on my counter this morning. (I've secretly been waiting for them to get to just the right amount of rottenness!)
      Banana Bread has been my favorite thing to make since I was in middle school. I would practice every time we had rotten banana's in the house growing up until I tweaked and perfected the recipe. I hadn't made it since I've been married so when I bought banana's during this last grocery trip I knew they were going to be for a greater purpose than pre-run snack. 

Disclaimer: This is not super healthy for you and probably packed full of calories!

Step 1: Gather Ingredients
3 cups of sugar
1 cup of oil
4 eggs
3 1/2 cups of flour
2 tsp. of baking soda
1 tsp of cinnamon
2/3 cup water
2 cups of mashed bananas 
(I always end up with a different amount of bananas, depending on how many are rotten that need to be used up, but it pretty much averages around 2 cups)

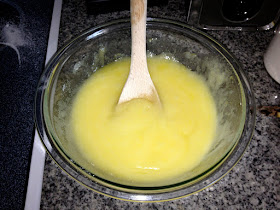
Step 2: Combine sugar, oil and eggs. It should look like the picture below:


Step 3: In a different bowl, combine all of the dry ingredients:


Step 4: Add Dry ingredients to Egg Mixture and add in your water slowly as you mix all of the ingredients together


Step 5: Once all ingredients have been mixed, take your bananas and mash them up to the consistency you want. Sometimes I'm in the mood for big chunks of banana in the bread and other times I just want it to blend right into the other ingredients. Once its all mashed up, add them to the other ingredients.


Step 6: Grease your pans. Liberally. I use vegetable oil - Like I said, its not healthy but it sure does taste good! Once you've greased your pans, sprinkle a cinnamon/sugar mixture over the bottom of the pan to add some extra flavor. 

Step 7: Poor your batter into the pans and then bake at 325 degrees for about 1 hour.
This recipe makes enough for 3 large loaf pans (about the size of the loaf pan in the picture) but I only happen to have one loaf pan at this time and I thought it would be nice to show that you can mix it up a bit and use this recipe to make it into muffins and coffee cake style and it still tastes great!


I also take the same cinnamon/sugar mixture and sprinkle it on top before putting the pans in the oven.

Step 8: Enjoy the finished product!


And if you have one, share a late night snack with your husband. : )


Saturday, September 15, 2012

Crock Pot Macaroni and Cheese

Time to switch gears for a couple of seconds... I'm going to go from home decorating to recipe sharing. And this probably won't happen often because I am by no means an expert cook. (not that I'm an expert home decorator either but....I digress...)

Mark and I got this lovely crock pot from my Aunt and Uncle for a wedding present. This was a little bit of a struggle when I wanted to register for one because Mark is not a big fan of crock pot meals...but my mom cooked some delicious meals in the crock pot for us growing up so I insisted we add it to our registry! He agreed after I promised to learn to cook delicious meals in it.

My first attempt = disaster. Chicken and rice casserole that turned out to look like baby food and Mark was not impressed. He was gracious enough not to rub the fact that he doesn't like crock pot meals in my face though.

Only a couple of weeks after that, we were over at Mark's parent's house and his mom made a crock pot macaroni that we loved! I decided to give it a try myself because Mark LOVES macaroni and cheese so I figured it HAD to better than my chicken and rice dish that failed.

I gathered all of the ingredients:


8 oz. of Elbow Macaroni Noodles
1 Large Can of Evaporated Milk
1/2 Cup of Butter (Stick) - Melted
1 1/2 Cups of Milk
1 Cup MILD Shredded Cheddar Cheese
2 Cups of SHARP Shredded Cheddar Cheese
1 tsp of Salt
1tsp of Pepper
Slices of American Cheese to cover top of mixture
Optional: Paprika to sprinkle on top


Step 1: Grease bottom and sides of crock pot with butter
Step 2: Cook Macaroni Noodles according to package


Step 3: Mix together all ingredients and then poor into crock pot.


Step 4: Cook on LOW for 3 hours. 

My mother in laws crock pot cooked her dish on a Low setting in under 1 hour so you'll have to play around with your crock pot settings. I was gone at work for about 4 hours after I put this in the crock pot and it turned out great! (The recipe doesn't specify whether it should be covered/uncovered but I covered mine. I just felt better with it being contained since I was leaving for work.) 


I laid the American Cheese over the top a few minutes before serving to allow time for it to melt. You can also add it in in the beginning as it's cooking.


It tasted amazing! Not to mention it was so refreshing to walk through the door after getting off work at 7pm and knowing that dinner was already made and ready to go.

Over all Mark was way more impressed with the crock pot this time around, so I'm hoping with a few more good meals in this baby I just might be able to change his feelings towards this 
small kitchen appliance.


Thursday, September 13, 2012

Project Dining Room: wall decor

5 dollar frames + .99 a piece for scrap book paper = cheap wall decor for my dining room!

Sunday, September 9, 2012

Project Kitchen: Rustoleum Cabinet Transformation


When we first bought our house I immediately knew I wanted to paint our kitchen cabinets white. I am pretty HUGELY fond of white cabinets in kitchens. And definitely NOT a fan of dark wood cabinets. This is what we had when we first moved in...

Dark. Out dated. Dirty. Gloomy.
But the question was... how would we go about transforming these dark gloomy cabinets into the bright cheery white cabinets I've always wanted? We basically had two options - sand them all down, choose our own white paint and make sure we Kilz the dickens out of these things before painting OR use the highly acclaimed Rustoleum method. The whole thing with Rustoleum is that everything you need is sold in one kit and you use a "de-glosser" solution to strip the old stain off of the wood instead of having to sand down the wood. It is supposed to be less work and less mess. I did a little research and it seemed like it would be the best choice. Lucky for us a lady from our church had just used the Rustoleum to do her and her mother's kitchen cabinets and loved the way they turned out, so that helped persuade us to use the kit. The only thing I was worried about was that they didn't exactly have a WHITE white color if we followed all of the steps. You see there is this second to last step called the "decorative glaze" that gives the cabinets a wood grain look. Its not that I don't like that look, its just that I wanted a white washed look and if I applied the glaze, then by the examples on the companies website, my white would turn into a cream sort of color. Not what I wanted. But I was assured that we could just skip that step and keep the white washed look so we decided that would be our plan.

So Step 1: We made a diagram sketch of our cabinets and numbered the doors, laying them out on our little paint station in order so we would be able to put them back in the right spot. We ended up buying new hinges for all of the cabinets so we just tossed the old ones. We kept all of the door handles.
Step 2: We got our de-glosser solution and used the scrubbing pads that the kit provided to scrub down all of the doors and the cabinet frames. This was actually a lot more work than I anticipated. It's supposed to be easier than sanding, but I found it just as labor intensive. The ONLY thing that made this better than sanding was that there was less mess. We did have to dry/wipe down everything, but it wasn't as bad as trying to vacuum up dust.
Step 3: Apply the "Bond Coat". This is the color part. We chose to go with Pure White. I mean, you can't get any more white than Pure White right? They say this part is only supposed to take 2 coats. We definitely had to put at least 3 coats, even 4 coats on some of the doors, but luckily we had plenty of paint in the can from the kit.
These are our cabinet frames after the first coat. I was starting to get excited!!!
The kit doesn't come with enough paint to pain the INSIDE of the cabinets but we ended up using some white paint that we had had for our trim to put a couple of coats on the inside for a cleaner look when you open the cabinets.
After we felt that our cabinets were white enough, no streaking or dark wood peaking through in places, we came to Step 4. This was the decorative glaze part that we decided to skip. So on to...
Step 5: Applying the Protective Top Coat. This was probably the hardest part of all! The top coat started drying pretty quickly so you couldn't keep brushing back and forth to make sure it was evenly spread out otherwise it would get all clumped up. (You know like when you try to put a second coat of nail polish on before the first coat is dry??? Yea, like that.) And if the top coat was clumped up at all in any spot it turned a slight yellowish color. I mean, it wasn't terribly noticeable, especially not once they were hung up, but when we were carefully inspecting our work we got a little frustrated that this kept happening. Also... One thing I noticed after we hung the cabinets was that since the top coat was a clear glaze it was hard to make sure you got every inch of cabinet when we applied it and so there were a few spots that look "flat" in the light of the kitchen instead of a shiny finish. 
Our cabinets drying in the garage after the protective top coat had been applied.
We used saw horses and 2x4's, plus a few cardboard boxes to create our paint station.


After the top coat dried it was time to hang up our newly restored kitchen cabinets!!!

Bright. Updated. Clean. Cheery.


Ta Da!!!

Over all we were really pleased with how the Rustoleum Cabinet Transformation worked for our cabinets! Yes, the de-glosser was harder than we thought. Yes, we had to apply more coats than they said. Yes, the protective top coat did leave a few tiny yellowish spots (like I said, these ended up being very un-noticeable once we hung up the cabinets) and a few "flat" spots. (Really, we wish we could've just covered everything but the cabinets and used a big spray paint gun to spray it all white but that just wasn't realistic.) Despite all of the negatives, the kit was very user friendly. We watched the instructional DVD that it came with and the steps were really clear and easy to follow. The supplies in the kit were more than enough to complete the project and even had enough left over to use the same method with a chair in our kitchen. We were really happy with the white color and we were able to finish everything in one weekend. (Friday morning -Sunday night).

I absolutely LOVE walking in to my kitchen now and seeing white cabinets. You just have no idea how happy this makes me. And since we actually did this a while ago, we have since then painted our walls and the rest of the kitchen trim! Our kitchen is pretty complete and it just happens to be one of my favorite rooms as far as the color/decorations that we've picked for our house so far!

I'll post pictures of our kitchen family painting day sometime later this week!

Saturday, September 8, 2012

Pinterest Project: Plastic Bags


I pinned this idea on Pinterest  a few weeks ago because for as long as I've lived, in my parents house and now in my own house, we've had plastic bags stuffed full of more plastics bags, tied up and then stuffed in to more plastic bags! And then eventually we collect so many we just throw the bags away and start all over them. So when I saw this on pinterest I thought I would give it a try.


So the first step was to flatten all the paper bags  (the site suggested to use 12? I think I used 20...) making sure to get all of the air out of them.


The next step was to fold the bags in half.


Next line all the bags up so the handles are over lapping the bottom of the next bag.


Then take the handle of the top bag and fold it up so that it stick out. That is going to be the part that sticks up so you can pull the bag out.


Then starting from the top you roll the bags up very tightly until they are rolled into 
one big roll of plastic baggies :)


My roll isn't quite as neat as the one from the blog where my original pin on pinterest came from... but I found it really hard to keep all of the air out of the bags!
Over all, it was a little more work than I think might be worth it, but once you do the initial rolling of all the bags it seems like you can just add bags on without a problem. (Maybe???) I just wonder if I'll actually take the time to roll them up or if its just easier to stuff them in a bag???
 It does work pretty well though, the first bag came out easily and a new bag handle popped up. The blog suggested using empty lysol disinfectant wipe containers to store the bags in, and she showed how to decorate it them, which I thought was a cute idea! I just didn't have any empty containers lying around to stick my new plastic bag roll in to. 


Tuesday, September 4, 2012

Project Front Yard: more flower bed!

My new work schedule started today which means I now have every Tuesday until 3pm to do whatever I want/need to! So today I decided to work on our flower beds a little more... Because it was free :)

We already cleaned out the bed from all the weeds and our one lariape plant that was already there finally had room to breath and it got huge in only a couple if weeks. So today I took out a few more shrubs that we didn't want and split up the plant into 4 quarters to fill out the flower bed. Hard work but I loved being home almost all day to get it done. :) ready to buy some fall flowers to plant this weekend!

P.s. see our cute gnome? Yea that's my husband's. He says he loves gnomes but I'm pretty sure it's just because he knows I sort of kind of don't. Buuuut he is kind of cute there :)